
Denis Jesus Gonzalez Sanchez
Verified Expert in Engineering
Denis is a certified C# specialist and MS certified professional, experienced in several programming languages and business domains.
Expertise
Years of Experience
15
Denis is a certified C# specialist and MS certified professional, experienced in several programming languages and business domains.
15
Reactive Programming is an asynchronous programming paradigm concerned with data streams and the propagation of change. – Wikipedia
Once you’ve read that sentence, 你可能还是会像我第一次读它时那样:根本无法理解它的相关性. 对基本概念多投入一点,你就会很快理解它的重要性. Basically, 一开始你可以把响应式编程想象成:“事件驱动编程的兴奋剂.” Picture an event handler as a stream, and think of each firing of the handler as a new datum in the stream. In a nutshell, what you end up with is Reactive Programming.
在深入研究响应式编程之前,您可能需要了解一些概念. Observables 这些对象能让你访问我们一直在谈论的流吗. Their purpose is to give you a window into the data in the stream. Once that window has been opened, you can look at the data in any way you choose by using Operators on it and thus decide when and how your application reacts to the stream. Lastly, you define the Observers 在生成的流上定义每次流发出新数据时将发生的操作.
In practical terms, 这只是意味着您可以更好地控制应用程序对正在发生的事情的反应方式, whether it be your user clicking on a button, your app receiving an HTTP response, or recovering from exceptions. 一旦你开始看到使用响应式编程的好处(有很多), you will hardly be able to go back. 这是因为应用程序所做的大部分事情都是以特定的方式对给定的可能性做出反应.
Now, this doesn’t mean there aren’t downsides to this new approach. First of all, its learning curve can be pretty steep. I’ve seen firsthand how developers (juniors, seniors, and architects, 在其他人中)挣扎着弄清楚他们应该先写什么, in which order their code is being executed, or how to debug errors. 在第一次介绍这些概念时,我的建议是展示大量的例子. 当开发人员开始了解事物应该如何工作和使用时,他们就会掌握其中的窍门.
我从事桌面应用已经超过10年了(主要是Visual Basic 6), Java Swing, 在2010年我第一次接触到Windows Presentation Foundation (WPF)之前. Basically, WPF was created to supersede Windows Forms, which is .NET’s first desktop development framework.
The major differences between WPF and Windows Forms are substantial, but the most important ones are:
一旦我开始学习WPF及其功能,我就完全爱上了它! 我简直不敢相信MVVM模式是如此容易实现,属性绑定又是如此有效. 我不认为我能找到任何改进这种工作方式的方法,直到我偶然发现了响应式编程及其与WPF的使用:
In this post, 我希望能够展示一个使用响应式编程与MVVM模式的WPF应用程序的非常简单的实现,并访问REST API.
The application will be able to:
您将构建一个使用RESTful Web API Core 2服务的WPF客户端.
The client side:
The server side:
What you’ll need:
The back-end
Start a new Visual Studio Solution with an ASP.NET Core web application.
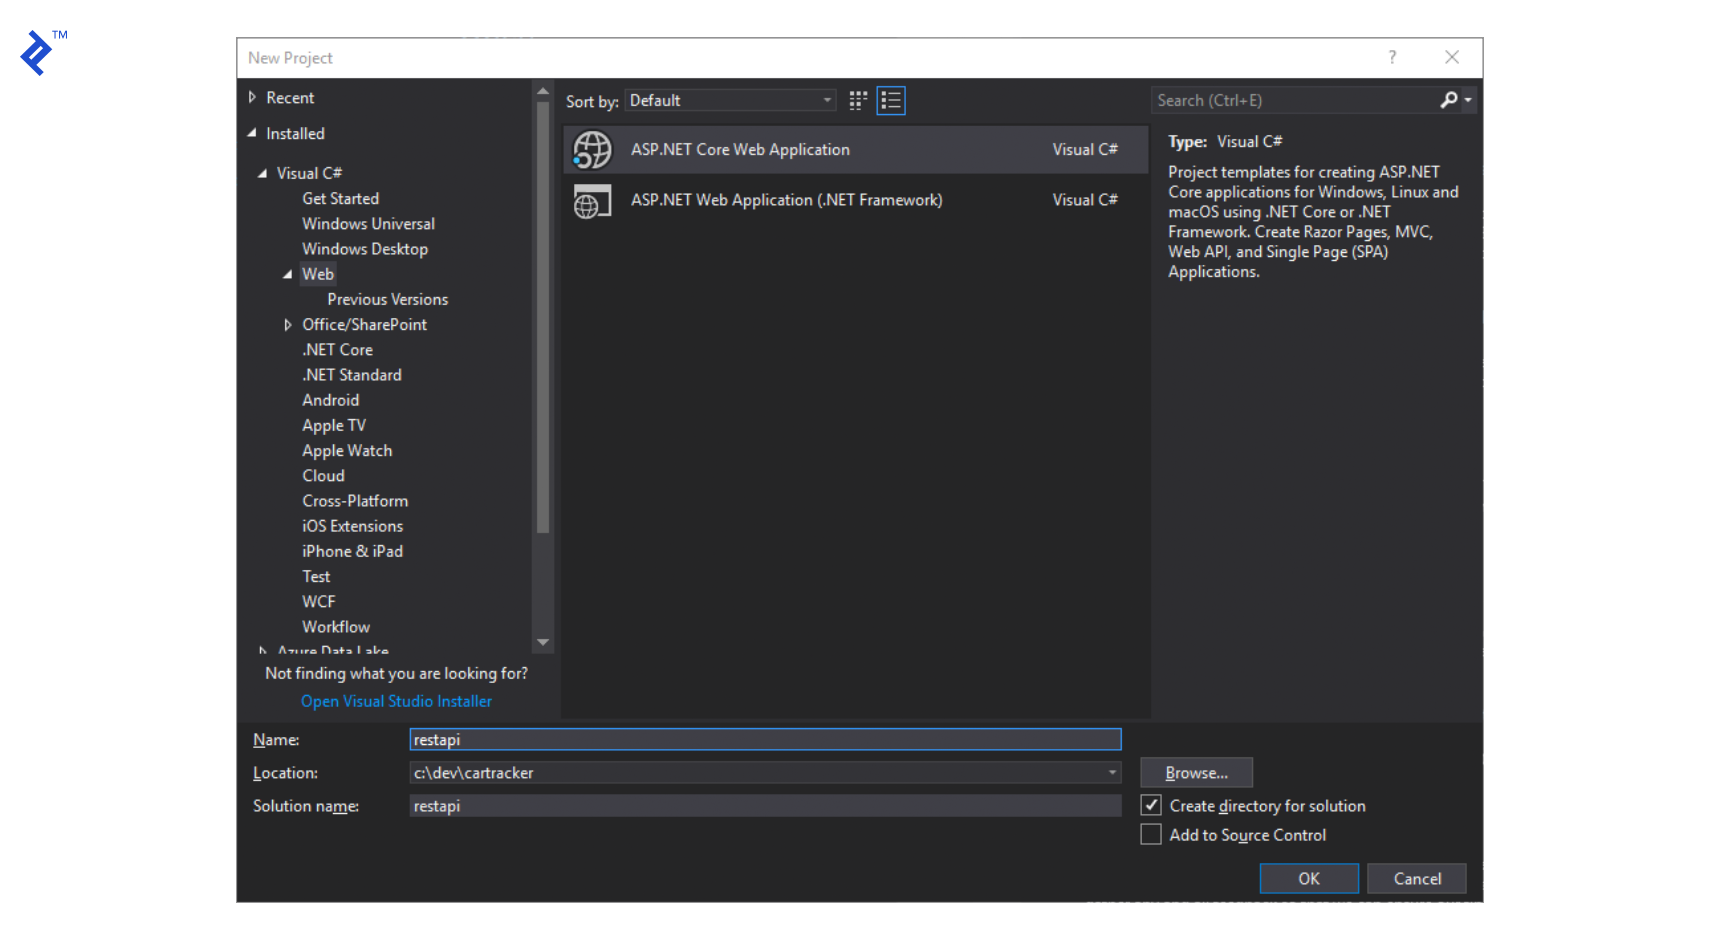
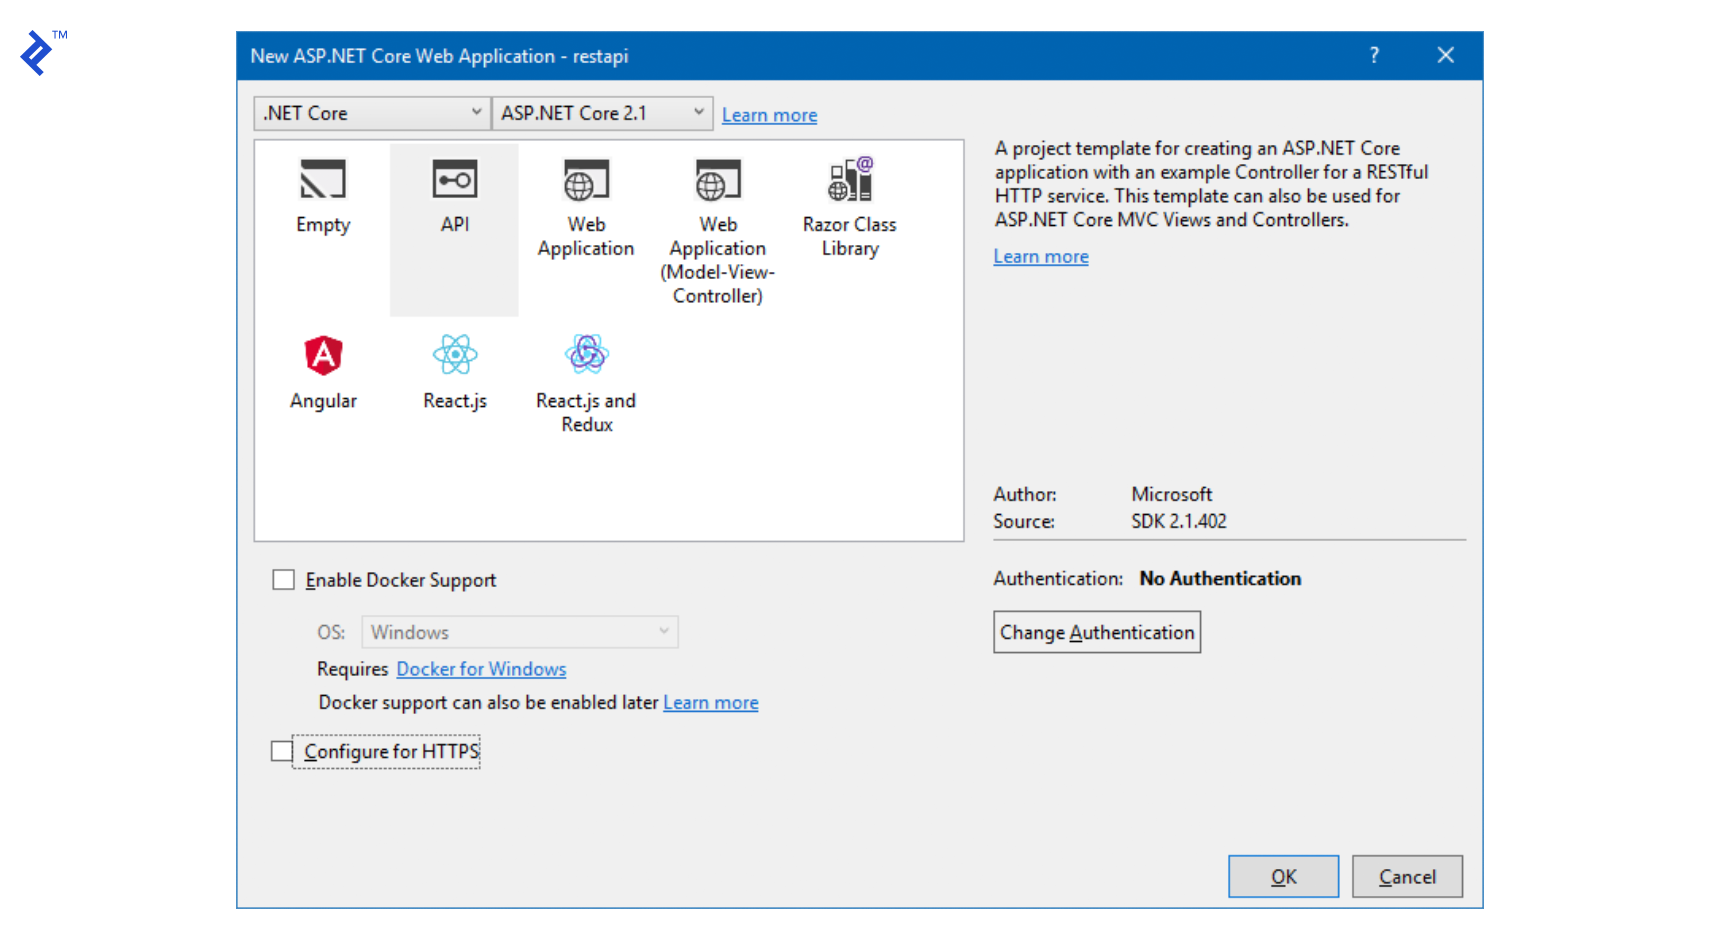
将它配置为API,因为我们只会将它用作WPF应用程序的后端.
We should end up with a VS solution with a structure similar to this:
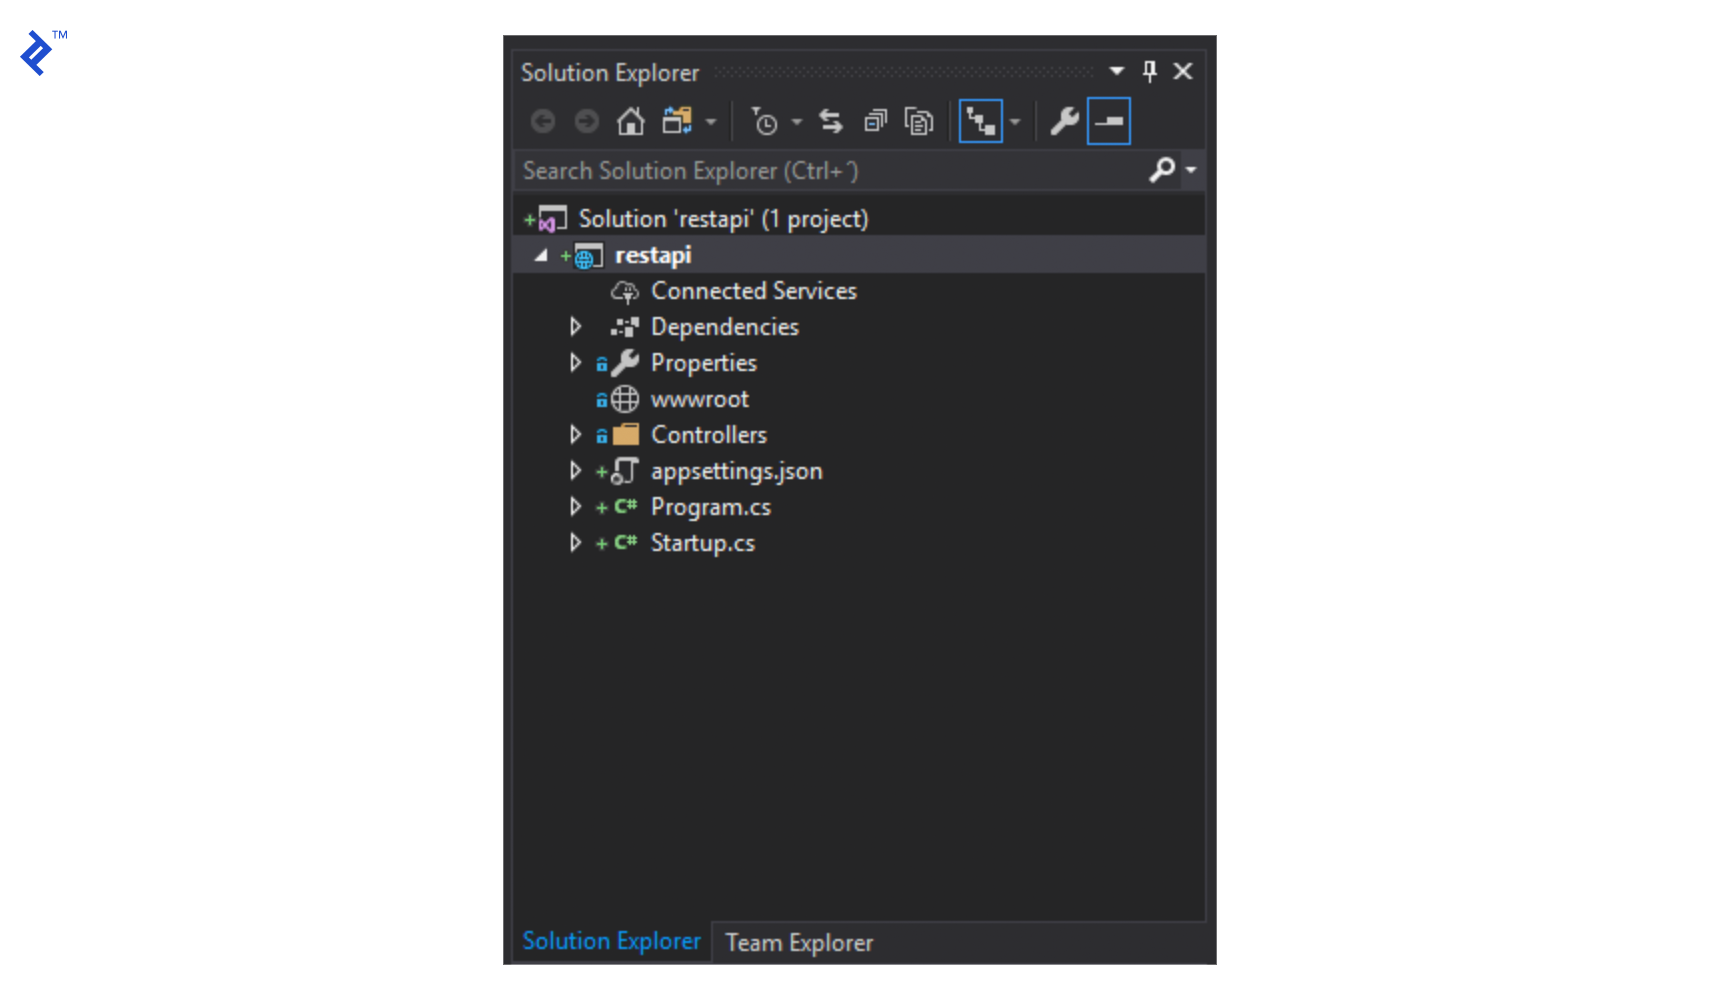
So far, we’ve got everything we need to start our REST API back end. If we run our project, 它将加载一个web浏览器(我们在Visual Studio上设置的浏览器),指向托管在IIS Express上的网站,该网站将显示对带有JSON对象的REST调用的响应.
Now, we’ll set up JWT Authentication for our REST Service.
At the end of the startup.cs file, add the following lines.
static readonly byte[] JwtKey = Encoding.ASCII.GetBytes(@"this is a test key");

private void LoadJwtAuthorization(IServiceCollection services)
{
        services.AddAuthentication(x =>
        {
                x.DefaultAuthenticateScheme = JwtBearerDefaults.AuthenticationScheme;
                x.DefaultChallengeScheme = JwtBearerDefaults.AuthenticationScheme;
        })
        .AddJwtBearer(x =>
        {
                x.Events = new JwtBearerEvents
                {
                        OnTokenValidated = context =>
                        {
                                var userId = int.Parse(context.Principal.Identity.Name);
                                if (userId == 0)
                                {
                                        //Handle user validation against DB
                                        context.Fail("Unauthorized");
                                }
                                return Task.CompletedTask;
                        }
                };
                x.RequireHttpsMetadata = false;
                x.SaveToken = true;
                x.TokenValidationParameters = new TokenValidationParameters
                {
                        ValidateIssuerSigningKey = true,
                        IssuerSigningKey = new SymmetricSecurityKey(JwtKey),
                        ValidateIssuer = false,
                        ValidateAudience = false
                };
        });
}
Also, inside the ConfigureServices method, call the method we just created before the AddMvc method gets called.
public void ConfigureServices(IServiceCollection services)
{
        LoadJwtAuthorization(services);

        services.AddMvc().SetCompatibilityVersion(CompatibilityVersion.Version_2_1);
}
Lastly, adjust the Configure method so it looks like this:
配置(IApplicationBuilder应用程序,IHostingEnvironment环境)
{
        if (env.IsDevelopment())
        {
                app.UseDeveloperExceptionPage();
        }

        app.UseAuthentication();
        app.UseMvc();
}
到目前为止,我们已经建立了JWT身份验证,如果定义了的话,将在控制器上使用它. 接下来,我们将调整我们的控制器,使其使用我们描述的身份验证.
On the ValuesController, we’ll add the AuthorizeAttribute so it resembles this:
[Route("api/[controller]")]
[ApiController]
[Authorize]
public class ValuesController : ControllerBase
{
...
}
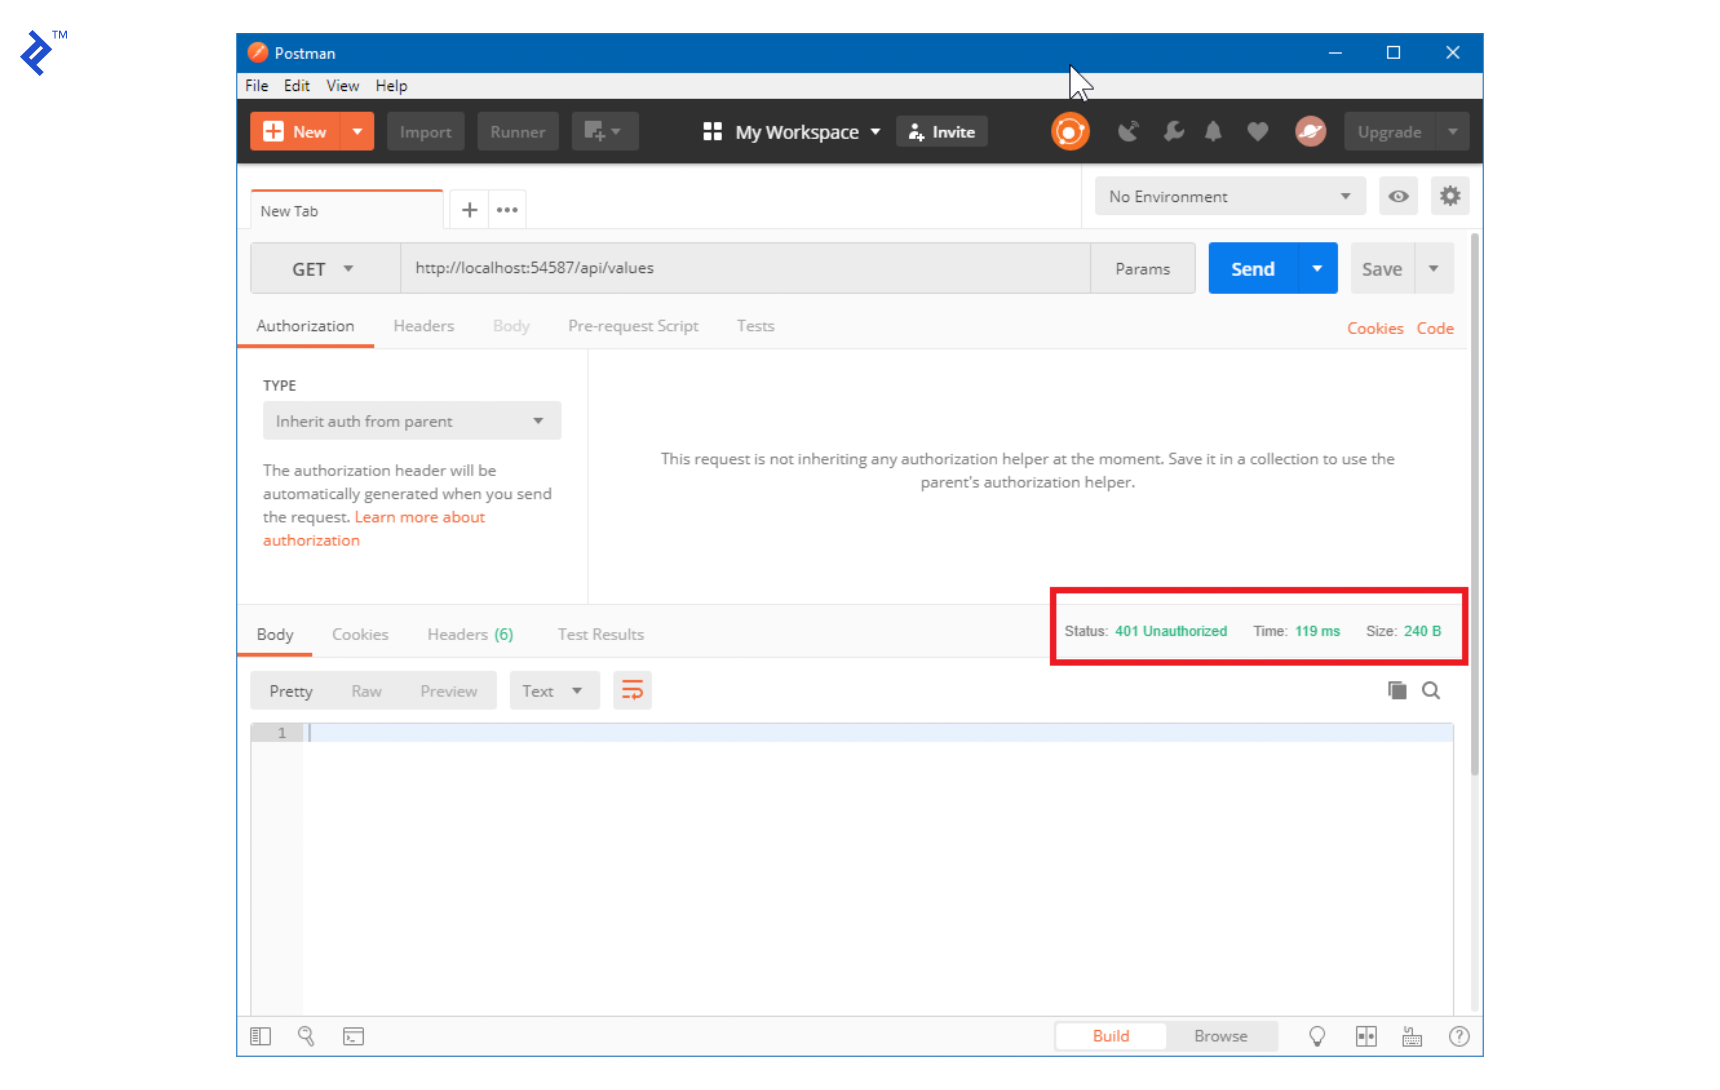
现在,如果我们尝试运行我们的服务,我们将得到一个401 Unauthorized错误,如下所示:
So, we’ll need to add a method to authenticate our users. For the sake of simplicity here, we’ll do it on the same ValuesController class.
[AllowAnonymous]
[HttpPost("authenticate")]
public IActionResult Authenticate([FromBody]JObject userInfo)
{
        var username = userInfo["username"].ToString();
        var password = userInfo["password"].ToString();

        //We would validate against the DB
        if (username != "user" || password != "123")
        {
                返回BadRequest(new {message = "用户名或密码不正确"});
        }

        //返回基本的用户信息(没有密码)和令牌存储在前端
        return Ok(CreateUserToken(1));
}

private string CreateUserToken(int userId)
{
        var tokenHandler = new JwtSecurityTokenHandler();
        var tokenDescriptor = new SecurityTokenDescriptor
        {
                Subject = new ClaimsIdentity(new[]
                {
                        new Claim(ClaimTypes.Name, userId.ToString())
                }),
                Expires = DateTime.UtcNow.AddDays(7),
                SigningCredentials = new SigningCredentials(new SymmetricSecurityKey.JwtKey), SecurityAlgorithms.HmacSha256Signature)
        };
        var token = tokenHandler.CreateToken(tokenDescriptor);
        return tokenHandler.WriteToken(token);
}
Now we’ve created a method with Anonymous access, which means that all clients, even those not authenticated, 将能够使用包含JSON对象的POST消息调用它,并传递一个字符串作为其用户名和字符串作为其密码.
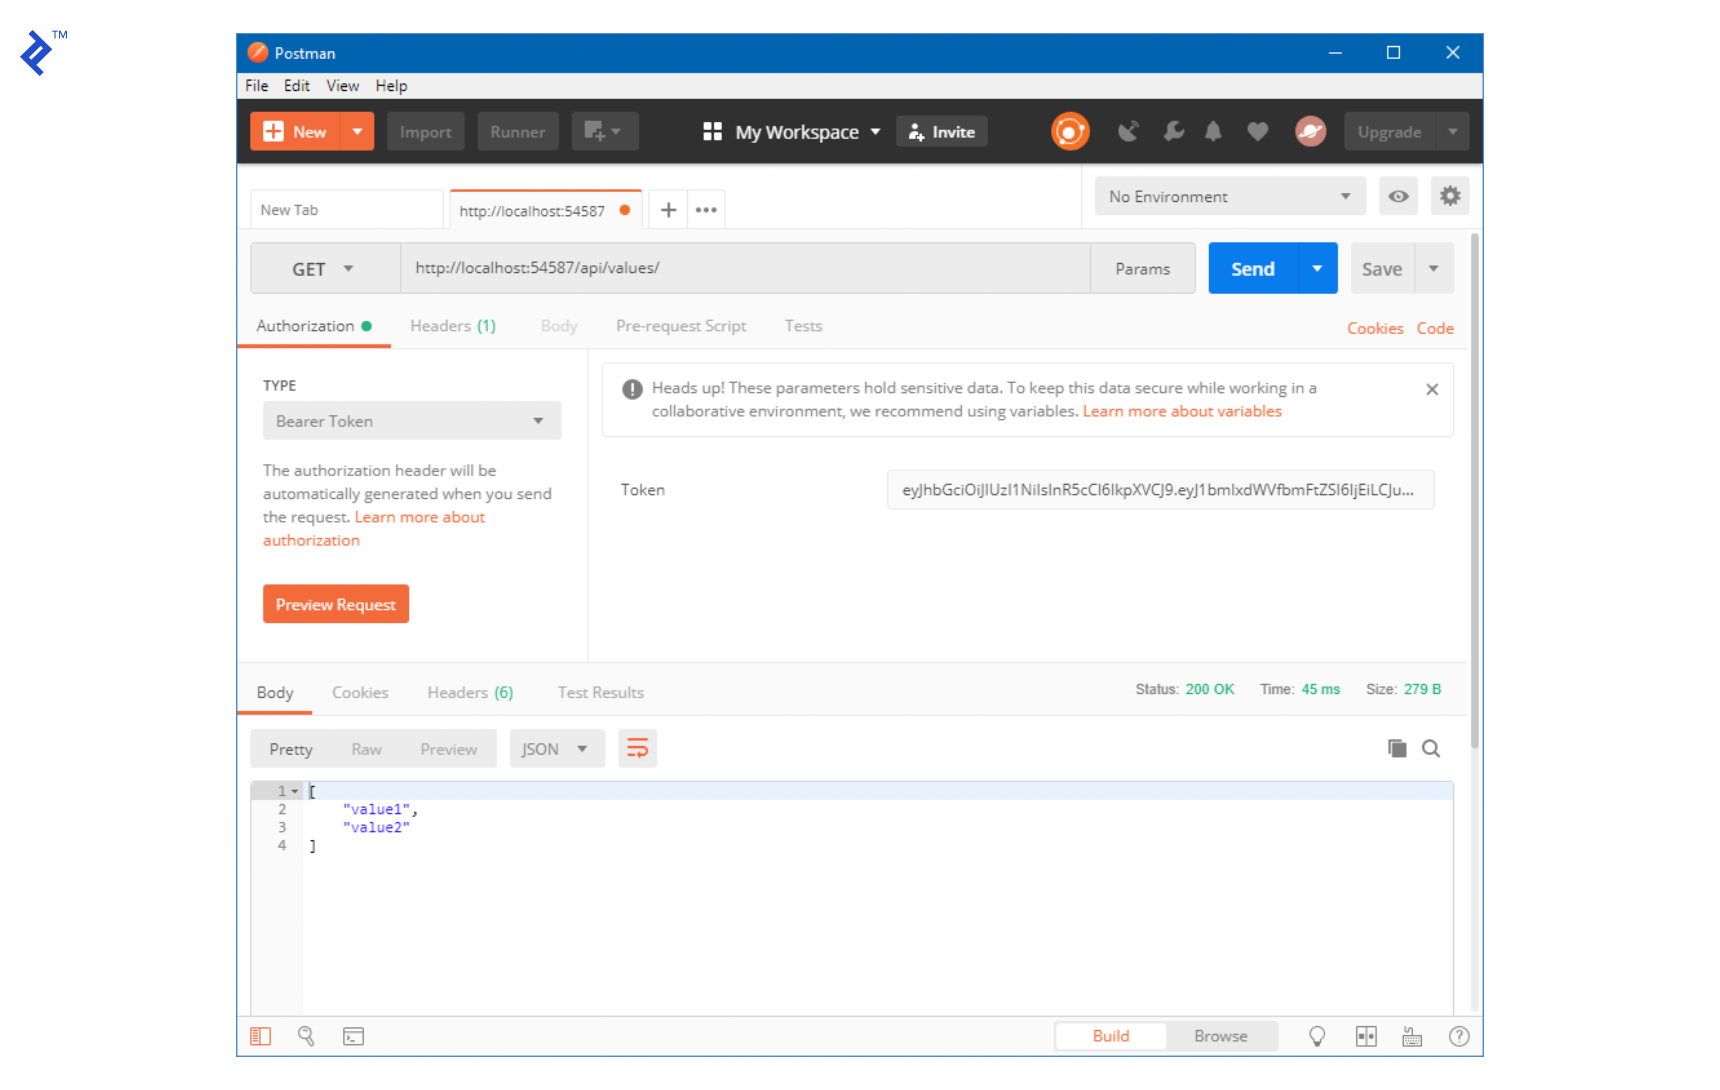
When we review it with Postman, we get this:

As we can see, 身份验证方法的结果就是我们现在需要在每次调用API时用作令牌的字符串.
Once the token is included in the headers of the message, the validation takes place and, if the correct parameters are passed, the service runs the method and returns its value. For example, if we now call the values controller and pass the token, we get the same result as before:
现在,我们将创建一个方法来获取我们正在跟踪的当前汽车的经纬度. Again, for simplicity, 它将只是一个虚拟方法,它将首先返回一个随机位置,并在每次调用该方法时开始移动固定距离的汽车.
First, we adjust the Get(int id) method in the ValuesController class to make it look like this:
[HttpGet("{id}")]
public ActionResult Get(int id)
{
        var location = LocationHelper.GetCurrentLocation(id);

        dynamic jsonObject = new JObject();
        jsonObject.Latitude = location.latitude;
        jsonObject.Longitude = location.longitude;

        return jsonObject.ToString();
}
Then, we add a new LocationHelper 类,该类将处理被跟踪车辆的当前和未来位置.
public static class LocationHelper
{
private static readonly Random Randomizer = new Random();
private const double PositionDelta = 0.0001d;


内部静态(双纬度,双经度)
{

        if (!Locations.ContainsKey(id))
        {
                Locations.Add(id, default((double latitude, double longitude)));
        }

        //此方法更新汽车的最后已知位置并模拟其运动
        UpdateLocation(id);

        return Locations[id];
}

private static void UpdateLocation(int id)
{
        (double latitude, double longitude)loc = Locations[id];

        //If the default value is found, randomly assign a starting point.
        if (loc.latitude == default(double) && loc.longitude == default(double))
        {
                loc = Locations[id] = GetRandomStartingPoint();
        }

        if (Randomizer.Next(2) > 0)
        {
                //In this scenario we simulate an updated latitude
                loc.latitude = loc.latitude + PositionDelta;
        }
        else
        {
                //Simulated longitude change
                loc.longitude = loc.longitude + PositionDelta;
        }

        Locations[id] = loc;
}


gettrandomstartingpoint ()
{
        //Set inside the continental US
        return (Randomizer.Next(31, 49), Randomizer.Next(-121, -75));
}

private static readonly Dictionary Locations = new Dictionary();

}
That’s it for the back end.
The front end:
We’ll now create a new WPF app. Once we’ve created it, Visual Studio将在我们的解决方案中添加一个具有以下结构的新项目.

Bing Maps Control:
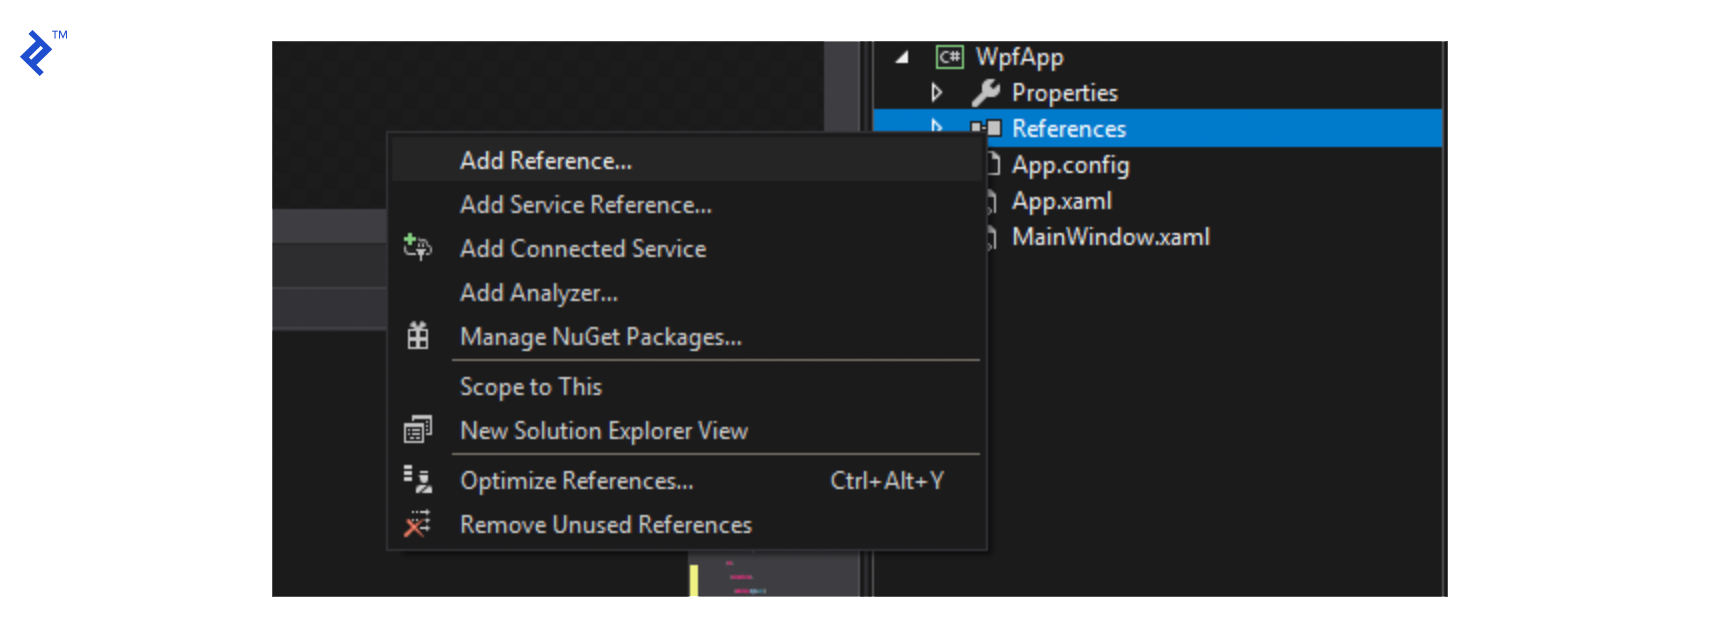
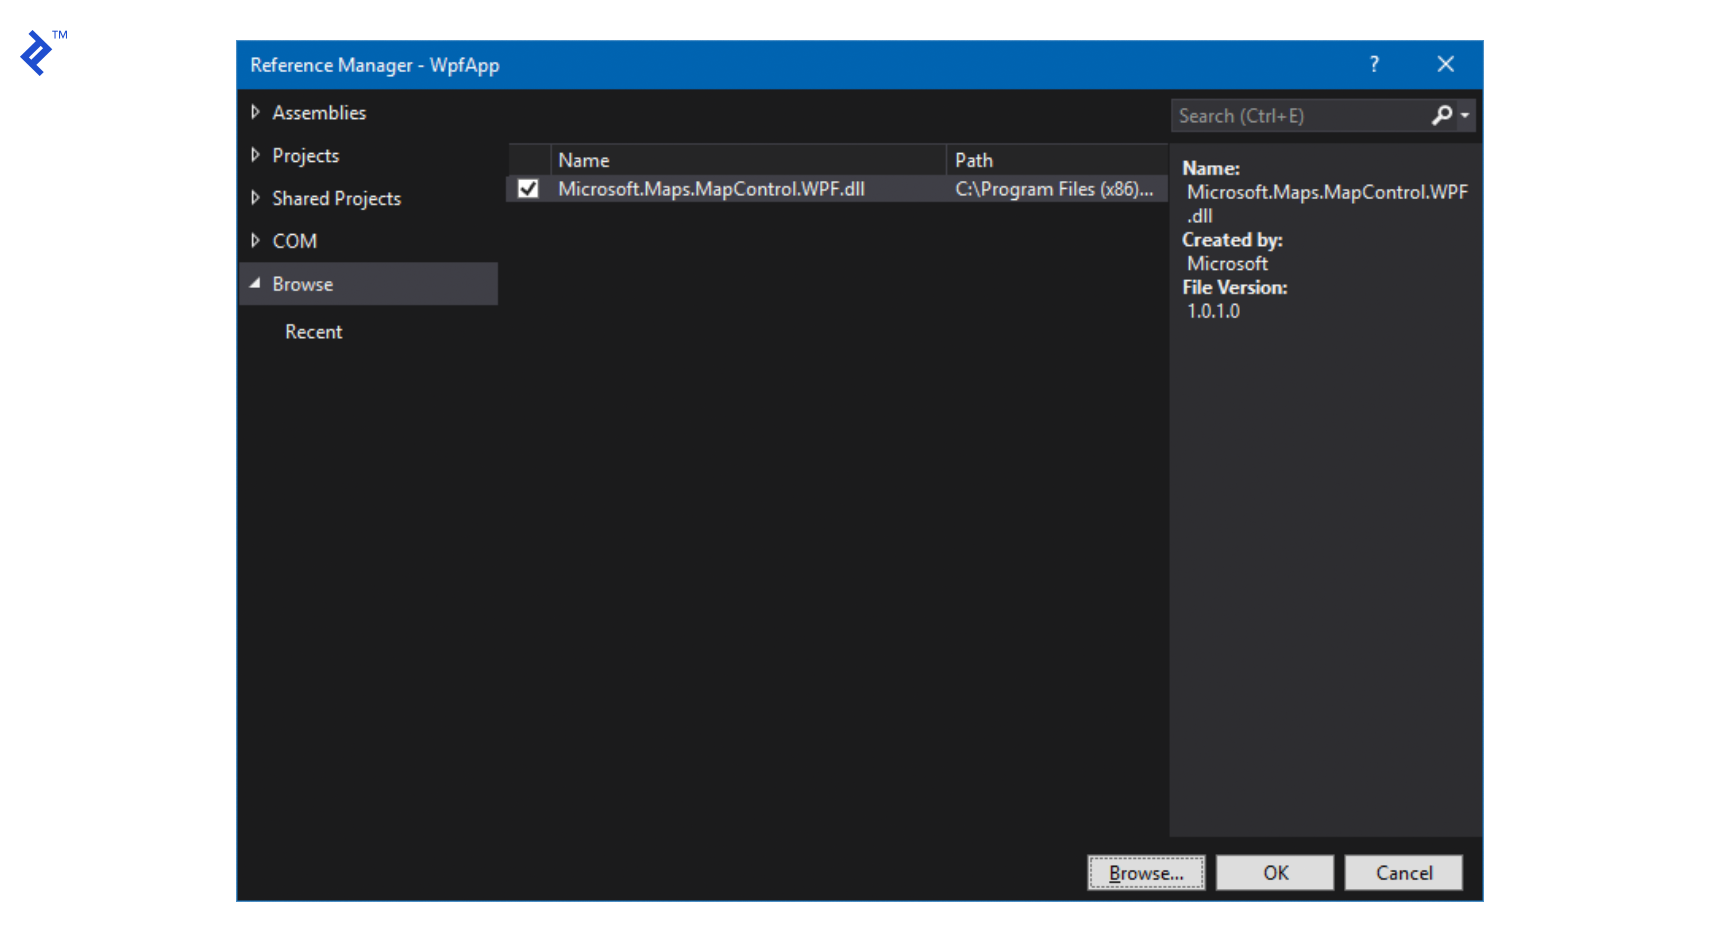
To use the WPF control for Bing Maps, 我们需要安装SDK(如上所述),并将其作为引用添加到WPF应用程序中. 根据安装位置的不同,DLL可能位于不同的路径上. I installed it on the default location and added it as follows:

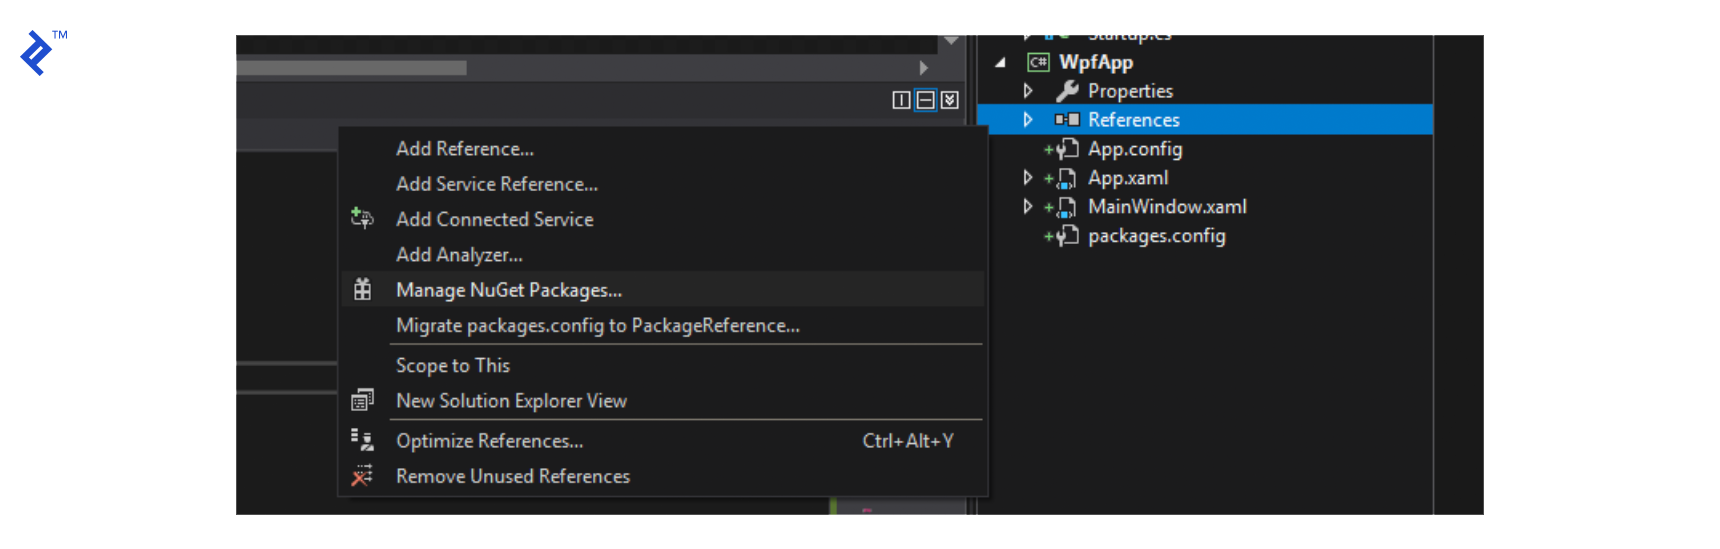
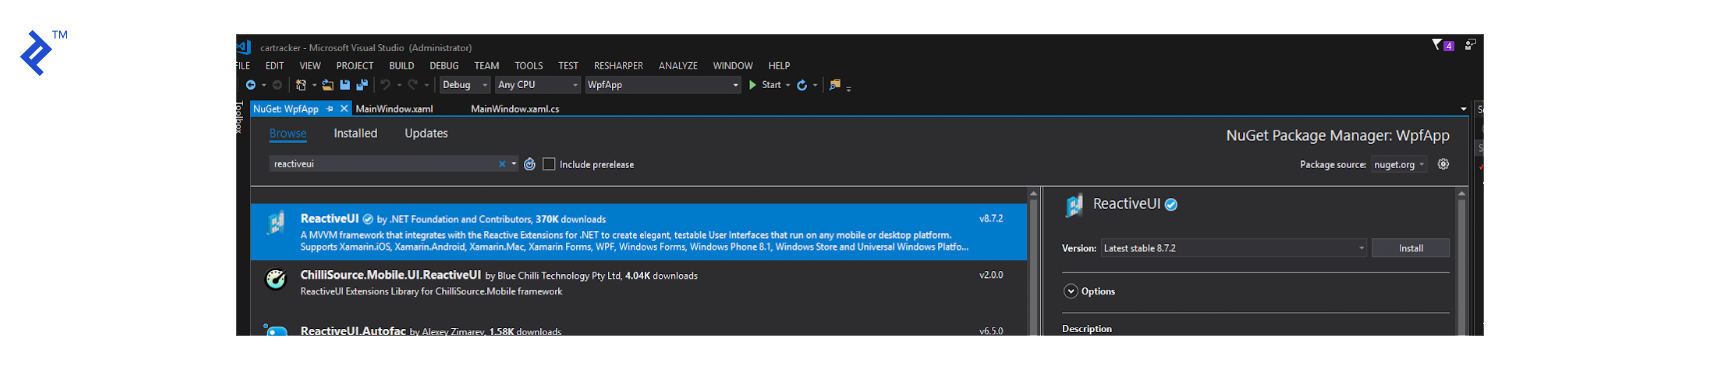
Next, we’ll add nuget packages for reactiveui, reactiveui-wpf and refit to our WPF project, 它将允许我们使用响应式编程和使用我们的REST API来创建视图模型.
We’ll now create our ViewModel. Add a new class called MainViewModel.cs and make it look like this:
public class MainViewModel : ReactiveObject
{
#region Private Members

private readonly ITrackingService _service;
private readonly ISubject<(double latitude, double longitude)> _locationUpdate;

#endregion

#region Methods

public MainViewModel()
{
        _service = Locator.Current.GetService();
        _locationUpdate = new Subject<(double latitude, double longitude)>();

        UpdateCar = ReactiveCommand.Create(() =>
                {
                        var parsedCorrectly = int.TryParse(NewCarToFollow, out int newCar);
                        NewCarToFollow = null;
                        if (!parsedCorrectly)
                        {
                                MessageBox.Show("There was an error reading the number of the car to follow. Please, review it.",
                                                "Car Tracking Service", MessageBoxButton.OK, MessageBoxImage.Warning);

                                return;
                        }

                        FollowedCar = newCar;
                }, canExecute: this.WhenAnyValue(x => x.NewCarToFollow).Select(x => !string.IsNullOrWhiteSpace(x)));


/*这个Scheduled方法是我们每500毫秒获取被跟踪汽车的位置. We call the service with the car id, our JWT Token, and transform the result to a ValueTuple (double latitude, 双经度)传递给我们的主题的OnNext方法,这样它就可以被视图*/接收

        Scheduler.Default.SchedulePeriodic(TimeSpan.FromMilliseconds(500),
                                           () => _service.GetLocation(FollowedCar, App.GetToken())
                                           .Select(jo =>
                                                   (
                                                           latitude: double.Parse(jo["Latitude"].ToString()),
                                                           longitude: double.Parse(jo["Longitude"].ToString())
                                                   )).Subscribe(newLocation => _locationUpdate.OnNext(newLocation)));
}

#endregion

#region Properties

private string _newCarToFollow;
public string NewCarToFollow
{
        get => _newCarToFollow;
        set => this.RaiseAndSetIfChanged(ref _newCarToFollow, value);
}

private int _followedCar = 1;
public int FollowedCar
{
        get => _followedCar;
        set => this.RaiseAndSetIfChanged(ref _followedCar, value);
}

public IObservable<(double latitude, double longitude)> LocationUpdate => _locationUpdate;

private ReactiveCommand _updateCar;
public ReactiveCommand UpdateCar
{
        get => _updateCar;
        set => this.RaiseAndSetIfChanged(ref _updateCar, value);
}

#endregion

}
To let the view know there’s a ViewModel 连接到它并能够使用,我们需要对 MainView.xaml.cs file.
public partial class MainWindow : IViewFor
{
public MainWindow()
{
        InitializeComponent();
        ViewModel = Locator.CurrentMutable.GetService();

        /*我们的ViewModel公开了一个IObservable,参数类型为ValueTuple(双纬度), 双经度),并且每次ViewModel从REST API更新汽车的位置时都会调用它.*/

        ViewModel.LocationUpdate
        .ObserveOn(RxApp.MainThreadScheduler)
        .Subscribe(SetLocation);
}

private void SetLocation((双经纬度)newLocation)
{
        //New location for the tracked vehicle.
        var location = new Location(newLocation.latitude, newLocation.longitude);
        //Remove previous pin
        myMap.Children.Clear();
        //Center pin and keep same Zoom Level
        myMap.SetView(location, myMap.ZoomLevel);

        var pin = new Pushpin
        {
                Location = location,
                Background = Brushes.Green
        };
        //Add new pin to the map
        myMap.Children.Add(pin);
}

///
///允许ViewModel通过一个依赖属性在XAML上使用
///
public static readonly DependencyProperty ViewModelProperty =
        DependencyProperty.Register("ViewModel", typeof(MainViewModel), typeof(MainWindow),
                                    new PropertyMetadata(default(MainViewModel)));

///
/// Implementation for the IViewFor interface
///
object IViewFor.ViewModel
{
        get => ViewModel;
        set => ViewModel = (MainViewModel)value;
}

///
/// Regular property to use the ViewModel from this class
///
public MainViewModel ViewModel
{
        get => (MainViewModel)GetValue(ViewModelProperty);
        set => SetValue(ViewModelProperty, value);
}
}
Then, we’ll modify the MainWindow.xaml file to make it look like this:
It is important to adjust the CredentialsProvider property with your own Bing Maps key.
To be able to access our REST API, we’ll be using refit. 我们所需要做的就是创建一个接口来描述将要使用的api方法. 因此,我们创建了一个名为ITrackingService的新接口,其中包含以下内容:
public interface ITrackingService
{

[Post("/api/values/authenticate")]
IObservable Authenticate([Body] JObject user);


[Get("/api/values/{id}")]
IObservable GetLocation(int id, [Header("Authorization")] string authorization);
}
Finally, we modify the App class to include dependency injection (using Splat, which was added when we included the reference to reactiveui), set the ServerUri (您应该在运行REST API时将其更改为您获得的任何端口)并在应用程序开始时模拟我们的登录.
public partial class App : Application
{

protected override void OnStartup(StartupEventArgs e)
{
        base.OnStartup(e);
        SetDependencyInjection();
        LogIn();

}

private void SetDependencyInjection()
{
        Locator.CurrentMutable.RegisterLazySingleton(() => RestService.For(ServerUri), typeof(ITrackingService));
        Locator.CurrentMutable.RegisterLazySingleton(() => new MainViewModel(), typeof(MainViewModel));
}

private static string Token;
private const string ServerUri = "http://localhost:54587";
private void LogIn()
{
        try
        {
                var userInfo = new JObject {
                        ["username"] = "user", ["password"] = "123"
                };

                Token = Locator.Current.GetService()
                        .Authenticate(userInfo)
                        .Wait();
        }
        catch
        {
                MessageBox.Show("There was an error validating the user. Is the service up?");
                Shutdown();
        }
}

internal static string GetToken()
{
        return $"Bearer {Token}";
}

}
Finally, when we run our application, 我们将能够看到一辆移动汽车的实时模拟,它的坐标每500毫秒从REST API获取一次. 用户还可以将被跟踪的汽车更改为任何其他ID, and a new set of data will be created for it.
我希望这个小示例已经以一种可访问的方式展示了在WPF中使用响应式编程处理REST API的基础知识.
You can always download the entire source project from this repository.
下面是一些可以帮助你进一步理解的地方:
在努力实现一种使用事件驱动编程的受控方式,而不会遇到这种范式固有的常见问题时,响应式编程被证明是有益的. 在新的开发中使用它非常简单,只需添加一些对受良好支持的开放源代码库的引用. But, most importantly, 将它合并到现有的代码库中可以是渐进的,并且不应该破坏与未实现它的组件的向后兼容性. This article dealt with Reactive Programming for WPF, 但它可以移植到大多数主流语言和框架,这使得响应式编程对任何类型的开发人员来说都是一个很好的冒险.
As an exercise, next, you should:
JSON Web令牌是JSON对象,是一种安全的方式来表示双方之间的一组信息.
JWT是现代应用程序使用身份验证的最流行的替代方案之一,因为它具有安全性和健壮性.
它们提供了一种简单的方法,以有序的方式处理事件驱动和异步编程,而且没有太多的开销.
新对象的构造可以在代码库中的单个点中定义, from then on, you can assume your objects will be available for you to use.
No. Windows Presentation Foundation是微软的一个图形化子系统,用于在基于Windows的应用程序中呈现用户界面.
这是为Windows设计桌面应用程序的一种方式. 在这方面,它可以被认为是Windows窗体的替代品.
WPF是微软推荐的开发新桌面应用程序的方法. With a decade of stability, 它是一组灵活的工具,用于创建美观和现代的应用程序,并允许轻松地分离关注点(外观) & feel vs design) like no other for the Windows environment.
Located in Mexico City, Mexico
Member since September 12, 2018
Denis is a certified C# specialist and MS certified professional, experienced in several programming languages and business domains.
 作者都是各自领域经过审查的专家,并撰写他们有经验的主题. 我们所有的内容都经过同行评审,并由同一领域的Toptal专家验证.
15
World-class articles, delivered weekly.
World-class articles, delivered weekly.
Join the Toptal® community.
